Showing posts with label dessert. Show all posts

Wednesday, April 24, 2013

Another Gluten Free Cupcake

Recipe for Vegan, Gluten Free Chai Tea Latte Cupcakes

With the success of my Maple Bacon Gluten Free Cupcakes, I thought I would try and see if the recipe would translate to another non-Gluten Free recipe from Vegan Cupcakes Take Over the World. The recipe I tried was Chai Tea Latte Cupcakes and I used the Gluten Free flour mixture from the Gluten Freedom Cupcakes in place of AP flour.

Hm, well they didn't turn out as nice as I had hoped. I thought the batter was looking a little watery and was worried the cakes wouldn't hold their structure. But they turned out ok. In fact, the crumb ended up being extremely moist and a bit dense. Not quite as fluffy as the Gluten Freedom Cupcakes. 

borderline "too moist" crumb
The flavor was unfortunately not so great either, which was probably mostly my fault. I was shocked to discover that I hadn't brought back one of the several bottles of ground cardamom I had in Japan. So in place of the cardamom I threw in a bit of Chinese Five Spice. Ha. Well, anise is similar to cardamom, right? ......   I also thought this cake had way too much cinnamon. In fact, that was all I could taste. But I thought there was potential in this cake, so I tried again. 

I went out and bought some $15 cardamom (!). I thought of replacing the soy yogurt with applesauce, but I wanted to get rid of some of that extra moisture, so instead I opted to omit the yogurt. I also put the loose leaf tea right into the cupcakes, rather than steep tea bags, since I really wanted the tea flavor to come out. As I was mixing, the smell of cardamom filled the kitchen and I was sure this was it. It smelled so good and nothing was even baking yet.


I have to say, the crumb looked so much better. They almost looked like they could be a little dry.
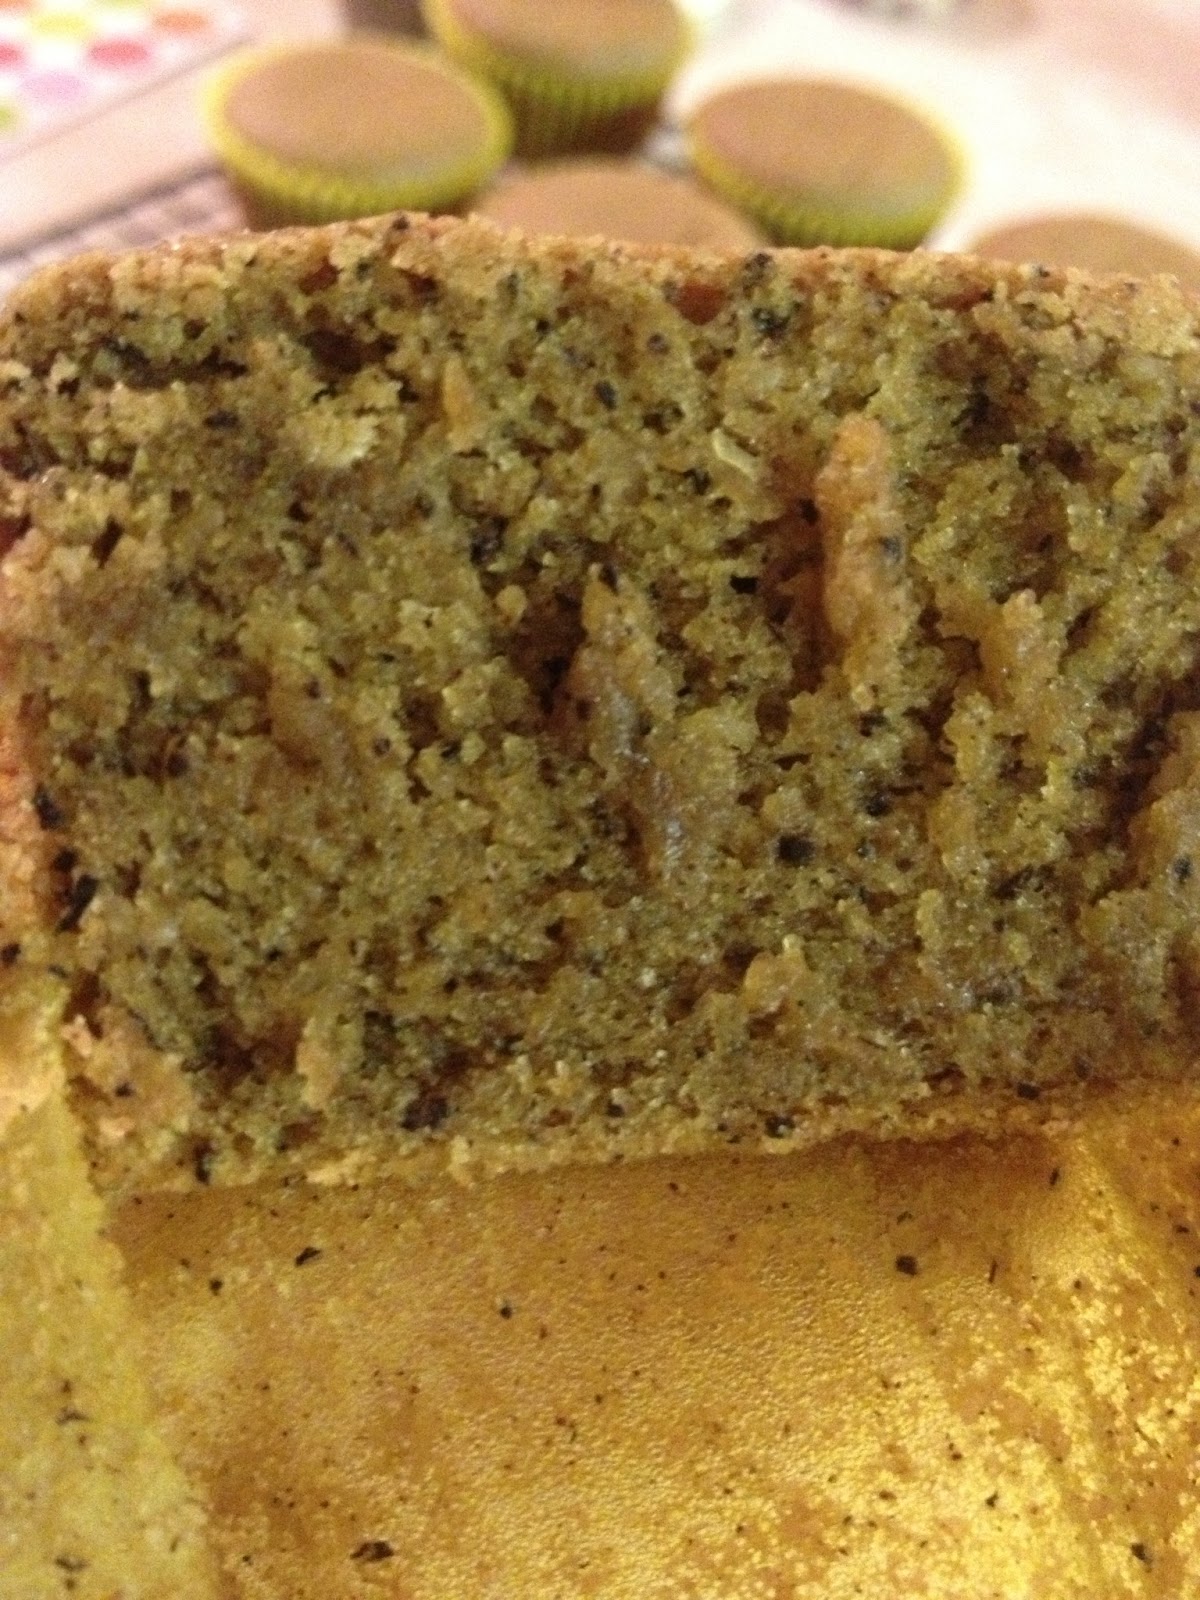
But after cutting it open I saw that it was still pretty moist. Still not quite as fluffy as I had hoped, but much better than the previous attempt. The flavor was, well, strongly of cardamom. *sigh*. BUT other than the fact that there was just way too strong a cardamom taste, I thought the cake overall was pretty good. It tasted much closer to a chai latte and the texture was much closer to a cupcake. My next thought is that perhaps I didn't mix everything long enough. Maybe my mixing even longer I can really develop the structure of the cake (and soak up the flax seeds better so you don't notice those little gritty bits when you chew). I'm also toying with the idea of scrapping the vegan part of it and using regular milk instead of soy. Not sure if that will change anything, since I haven't played around much with gluten free yet. 
So this is still a work in progress, but I am MUCH closer than before.

So here is my *untested* recipe for Gluten Free Chai Latte Cupcakes, adapted from Vegan Cupcakes Take Over the World.

Ingredients:
1 cup soy milk
1/4 canola oil
3/4 sugar
1tsp. vanilla extract
1/4 cup tapioca flour
2Tb. ground flax seeds
1/3 cup almond flour
1/2 cup white rice flour
1/2 cup quinoa flour
1tsp. baking powder
1/2tsp. baking soda
1/4tsp. salt
1tsp. ground cinnamon
1/2tsp. ground cardamom
1/4tsp. ground ginger
1/4tsp. cloves
pinch of white pepper (I used cayenne, but white pepper is probably better)

1. Preheat oven to 350℉ and prepare cupcake pans.
2. Heat soy milk in a small saucepan on medium heat until almost boiling (should at least be steaming). Remove from heat, add the tea, and let steep/cool for at least 10min.
3. Whisk together in a medium bowl the flours, baking powder, baking soda, salt, and spices.
4. When the soy milk has cooled a bit, pour back into measuring cup and add any extra soy milk to make sure it is 1 cup. 
5. Lightly whisk together the soy (tea) milk, sugar, oil and vanilla until blended. Add tapioca flour and flax seeds and beat on medium speed for about 1 minute, or until the tapioca has completely dissolved. You may want to beat a little bit longer to really make sure the flax seed are incorporated into the batter. 
6. Add remaining dry ingredients, mix at low speed. Once the ingredients are incorporated, switch to medium-high speed and beat for 2 minutes or more. 
7. Fill cupcake liners 3/4 full (the cupcakes will rise, but deflate a bit when they are ready to be taken out of the oven) and bake 20-22 minutes. 

*************************************************
Frosting Ingredients (American Buttercream):
1/2 cup high ratio shortening (Sweetex if you have it, otherwise Crisco will do)
1/2 cup unsalted butter, room temperature
3 1/2 cups powdered sugar
1/4 cup cornstarch
2-3Tb salt water (just add salt until it tastes salty, about 1-2tsp. per 1/2 cup)

1. Blend the butter and shortening until thoroughly creamed.
2. Add powdered sugar and cornstarch and slowly blend with butter mixture.
3. Add salt water small bits at a time until the frosting comes together (you may not need all the water) and then blend on medium-high for about 3-5min.
4. Spread onto cooled cupcakes. You can decorate them with large cinnamon sugar crystals.

Thursday, April 11, 2013

The Cake Wars

I'm beyond frustrated....

I have always been able to make a decent cake. Chocolate, Carrot, whatever. My cakes were always pretty good. I even became the unofficial birthday coordinator in my office, making a birthday cake for all my friends and many of my coworkers. But the one cake that always threw me off was vanilla. Such a simple cake, yet the most troublesome. I tried quite a few different recipes, and while they always turned out alright, none were ever spectacular. None were up to my overachieving standards.

So after moving back to the United States, where butter and flour are sold at reasonable prices, I decided to start a Vanilla Cake project. It was so tempting at first to start using cake mix. It seemed every other week the supermarket had them on sale for near $1 to $1.25 a box. Easy AND cheap, what a great combo! But I felt really uncomfortable with all the chemicals listed on the side, not to mention my own sensitivity to processed foods. So, I decided it best to avoid cake mix at all cost and stick to scratch baking. I was determined to create the perfect base vanilla cake. One that was so tasty on its own, but versatile enough that I could add other flavors and expand. That's not asking too much, is it? 

Day 1: I don't have a picture. I was making blue colored cupcakes for a friend and experimented with a couple recipes. 

  • Recipe 1: Joy of Baking White Cake - ok, this isn't vanilla cake. But I was making blue cupcakes, not green. These turned out awful. Completely awful. In part, it was my fault because I think I whipped my egg whites too long, so they were probably too stiff when I put them in. They ended up a bit dry and kinda rubbery at the crust (because of the overbeaten egg whites) and tasted like baking soda. Gross. I did make this cake once before as a rainbow cake ("gayke" - picture below) and it turned out alright, flavor and all... but this time it was all bad. 
  • Recipe 2: Glorious Treats "Perfect Vanilla Cupcakes" - I had high hopes for this one. The author testified that she went through dozens upon dozens of cupcakes to perfect this recipe. Well, they turned out pretty darn good. They did bake perfectly and they were so spongy and light. However, the taste was not so great. Again, this tasted a little heavy on the baking soda and using oil in the recipe I think left something missing in the final product. I don't know how to describe it, but it was almost like eating a hallow cake. It was perfect and yummy on the outside, but it just didn't taste "complete". ok, not the greatest explanation... but in the end I was disappointed. It looked perfect, but the flavor just wasn't there.
Day 2: After disappointment with the "Perfect Vanilla Cupcakes", I went online and bought myself the Cake Bible
Yeah, so these didn't turn out so great either. *sigh* I tried 2 white cake recipes and 2 yellow cake recipes. 4 dozen cupcakes. ugh. From L-R:
  • Recipe 3 - Vanilla cake recipe from Three Little Blackbirds. This recipe is based on the yellow cake recipe in the Cake Bible, but supposedly adapted to perfection. Ummmm, well the cupcake didn't rise much and was quite wet and sticky on the outside. I thought it tasted "ok", but the consistency was NOT what I was going for. Next, please.
  • Recipe 4 - The Cake Bible "All Occasion Downy Yellow Cake". This one rose too much and then flattened on the top. I also found that it took much longer than the recipe said for it to bake. I think I baked them an extra 10-15min. Consequently, the tops were hard and crusty, and somehow a bit rubbery (? not sure why). The inside of the cake was good though. My thought was to try this recipe with oil instead of butter.
  • Recipe 5 - The Cake Bible "White Velvet Cake" - I read really good reviews online about this one. The flavor was really good, but as you can see, the top baked flat and it was crumbly/flimsy. Half the top broke off when I tried to pick it up. According to the book, either my oven temp was too low or I undermixed - both possibilities because I was trying not to overmix and not really checking the temp of my oven. 
  • Recipe 6 - The Cake Bible "White Velvet Cake" - After seeing the results of the Cake Bible cupcakes, I substituted oil for the butter and remade the White Velvet Cake. I added a tsp of butter flavoring to make up for the lack of butter. The texture of the cake was perfect. I also replaced a portion of the milk content with yogurt for moisture, but I'd like to try this again with just milk. Overall, I thought this cake was pretty good, but it gave me a bit of that "empty" or "incomplete" feeling that I got with the Three Little Blackbirds cake. Back to the drawing board.
Day 3: I really have high hopes for the Cake Bible. So many bakers swear by it. So I tried it again. This time, I waited until my oven was preheated before I started making the cakes, just to be sure the oven was hot enough by the time I got my cakes in there. I am going to make a "construction" themed cake for my cousin's 1st birthday (will post later), hence the crazy yellowness of the cake. It's the food coloring, not the recipe.
  • Recipe 7: I first made the one on the right. The Cake Bible All Purpose Downy Yellow Cake (again). I thought that maybe I was having trouble because the last time I made this, I halved the recipe. This time I did the whole recipe (a super thick 9" round layer and 10 cupcakes). For some reason I have such a hard time baking these. And I don't know if it's a human error, or if it's my oven. It's most likely me, and I have no one here to tell me what I'm doing wrong! Ok, so this cake baked better than the last time I tried it, but it was still dry. The top of the cupcake was again crusty and dry. This time the inside was a bit dry too. The flavor was ok. *sigh*
  • Recipe 8 (the one on the left): Bakerella's "Moist Yellow Cake" - This one uses butter AND tells you to add butter flavoring. What? Really? Well, I did. and...    it was all sorts of awesome. I loved the flavor, but thought it could use some more vanilla. This is probably the closest I have come to achieving my goal. However, as you see, the crust completely crumbled off as I tried to get it out. Also, the 9" cake crumbled to pieces when I tried to get it out the pan. Big Phat PHAIL! *grumble*. Well, even though the cake was unstable and the top was completely crusty and crumbly, the inside was heaven. Seriously. Moist and great flavor. I am so close! I just need to fix the consistency and figure out what's going on with my oven. Although I used Bakerella's recipe, I followed the semi-complex mixing instructions from the Cake Bible (because I'm still thinking that this really is the Bible of cakes). Perhaps that is where things went wrong. But it's just cake, right? (ha). My notes on this are to add another teaspoon of vanilla, take the cake out before it looks done (because I seem to keep overbaking!), and wait until the cake is completely cool before I take it out of the pan. Oh, and perhaps I should buy an oven thermometer? I don't like my cupcakes to have a crusty top! Oh again, I also thought of removing 1 egg, since the cakes were so unstable. Most other recipes I have found only use 3 eggs. But maybe i'll try the recipe once more as is, before I start playing around with eggs.
After all these disappointments, I searched online and found a great link. 

Day 4: I'm a bit sick of cake. In fact, this isn't a project in the works 4 days in a row. I started about a month ago, and ate so many test cupcakes that I made myself sick (because of my sensitivity to gluten & sugar). I couldn't eat normal food for about a week and had to give up coffee for a good two weeks (gasp!). My stomach is still in a bit of a funk, but I needed to get all the layers done for my cousin's construction cake, so I went at it again. I tried Bakerella's recipe again, following her instructions (not the Cake Bible) and adding a teaspoon of vanilla [note: I don't have self-rising flour so I mixed 3 cups homemade cake flour with 2tsp baking powder and 1tsp salt. I previously used 4 tsp. baking powder as per instructions in the Cake Bible, but I read in the Cake Bible forums that reducing the amount of baking powder will help make a more domed cake].
they at least look MUCH better

  • Recipe 9: seriously. 9 dozen cupcakes. The local supermarkets are loving me. So I used Bakerella's Cake Recipe and followed it to the "t". The result, not as good as yesterday's cakes! What's going on here? They baked pretty awesomely though, so I'm going to stick with my reduction of 2tsp. baking powder instead of 4tsp. However, I thought that the batter just wasn't as flavorful and still had a slight crust on the top. I'm really thinking it might be my oven. I bought an oven thermometer and even when my oven "beeped" that it was at 350°F, my thermometer only read 200. So I kept it going for another 30min. My thermometer only read 280. Which do I trust? The oven or the thermometer? I turned up the oven to 360°F and gave that a shot. The thermometer hovered around 300. But my cakes started to brown around the edges too early, so I turned it back down. I think I have a faulty thermometer. hmph. Ok, whatever. I will revert back to the Cake Bible recipe, but reducing the amount of baking powder to 2tsp. and adding 1/2tsp. of butter flavoring... because I love butter. Since I have 3 dozen cupcakes in the freezer and absolutely no more space, I guess I will have to wait until the next baking opportunity to try this recipe. 
To Be Continued...

Saturday, April 6, 2013

Chocolate Peanut Butter Cake

日本語はこちら
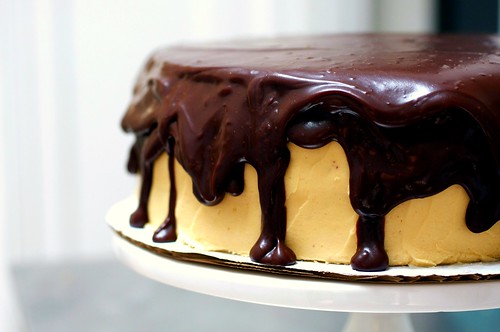
Photo: Smitten Kitchen

Another back-log.

I don't remember how I came up with this one. Well, I didn't come up with it, but when I was thinking of a birthday cake to make someone, I suddenly had a thought of making a peanut butter cup cake. I did a search online and found TONS of peanut butter cake recipes. I looked through a few and tried one out and it was amaaaazing. Loved it! I added a bit of coffee to add depth and bitterness to my cake and it went so well with the sweet, creamy peanut butter frosting. Yum! So here's the recipe, taken from Smitten Kitchen.


Chocolate cake (makes two 8" or 9" layers):


2 cups all-purpose flour
2 cups sugar
3/4 cup unsweetened cocoa powder, preferably Dutch process
2 tsp baking soda
1 tsp salt
1 cup canola oil
1 cup yogurt (original recipe calls for sour cream)
1 1/2 cups water
2 Tb distilled white vinegar
1 tsp vanilla extract
1 Tb strongly brewed coffee 
2 eggs


Peanut Butter Frosting:


1 8oz. package (200g) cream cheese, at room temperature
8Tb (100g) unsalted butter, at room temperature
4 cups (450g) confectioners’ sugar, sifted
2/3 cup (175g) smooth peanut butter


Peanut Butter Chocolate Glaze

8oz (227g) dark chocolate
3Tb smooth peanut butter
2Tb light corn syrup (homemade corn syrup recipe)
1/4 cup (60mL) milk
1/4 cup (60mL) cream


To Make:


1. Preheat the oven to 350°F (180℃). Spray or butter/flour the cake pans. Line the outside of the pan with bake even strips. [see the Chocolate Stout Cake recipe for homemade versions of these].

2. Sift together the flour, sugar, cocoa powder, baking soda, and salt into a large bowl. Add the oil and sour cream and whisk to blend. Gradually whisk in the water, followed by the vinegar, vanilla and coffee. Whisk in the eggs and beat until well blended. Scrape down the sides of the bowl and be sure the batter is well mixed. Pour equally into the pans and bake for about 30-35min.

3. When your cake is done, let it completely cool [see the Chocolate Stout cake recipe for instructions on how to check if your cake is done]. After they have completely cooled, line with wax paper or parchment and seal with foil, then place in the freezer for at least 30min. to firm up.

4. While the cake is chilling, make the frosting. In a large bowl with an electric mixer, beat the cream cheese and butter until light and fluffy. Gradually add the confectioners’ sugar 1 cup at a time, mixing thoroughly after each addition and scraping down the sides of the bowl often. Only use your electric mixer in this step if you are using a deep bowl, otherwise powdered sugar will go flying everywhere. If you don't have a deep bowl, I would recommend adding the sugar by hand (with a wooden spoon). Once the sugar is incorporated, beat on medium speed until light and fluffy, 3 to 4 minutes. Finally, add the peanut butter and beat until thoroughly blended.

5. Remove your cake and spread a crumb coat, then cover with the final layer after the crumb coat has set. Put in the fridge to chill again, so it doesn't melt when you finally put on the chocolate glaze. 

6. While the cake is chilling, prepare the glaze. Put all ingredients in a microwave safe, medium sized bowl and heat 30 seconds at a time, until completely melted. Stir the ingredients well between each heating to make sure the heat is evenly distributed. This will take about 2-3 minutes of heating. Be careful not to heat too long, or your chocolate will burn.

7. Pull out your frosted cake and place over some wax paper or baking sheet, to catch any of the dripping chocolate. Then just pour away! If the chocolate isn't spreading evenly over the top of the cake, use an offset spatula to spread. Make sure to do this quickly, because the chocolate will start to harden over the chilled peanut butter. Refrigerate uncovered for at least 30 minutes to allow everything to set. You can serve it just like this, or add some crushed nuts or leftover peanut butter frosting swirls on top. Here are a couple examples of what I did before.
This is what happens when you burn chocolate. I overcooked the chocolate a tad, so it got grainy on me. It's ok though. I covered it with some oreo crumbs and homemade fondant.
I again tried to make the glaze cover the cake perfectly. It looks better all dripping over. I couldn't think of how to decorate it, so I put on some fresh flowers [!! if you use flowers, make sure they aren't chemically treated, or your frosting is going to taste funky -- and probably not be too good for consumption]


Wednesday, April 3, 2013

Chocolate Stout Cake Heavenly Goodness

I have succumbed... (日本語はこちら)

For the last few years, friends have told me to start a food blog. I have avoided it because I have a bad habit of not keeping up with big projects (just take a look at my closet full of yarn covered hangers, of which only ONE is actually covered in yarn). I also don't have much confidence in my abilities so I didn't feel I had any right posting my stuff online next to famous food bloggers like Bakerella, Ree Drummond (The Pioneer Woman) and Deb from Smitten Kitchen. Well, I'm now in the middle of taking a hiatus from life after living and working in Japan for almost 9 years. I quit my job at the end of 2012 and decided to move back to my hometown to catch up with my growing extended family. Taking advantage of this new "opportunity" in life, I am now trying to explore more with cooking, baking, and other DIY crafts. With all this extra time on my hands and forgotten mental notes I made with past recipes I thought... why not? I figure this will be a way for me to keep track of all the recipes and products I have tried, so I don't make the same mistakes and share some of the great finds I have made over the years. The internet has way too much stuff on it so we need to filter it somehow!

So for the next xx days I guess I will be back-logging old recipes I have used and posted on facebook so I have all this stuff in one place. By the way, is anyone else sick of facebook? I mean, I hate it, yet I'm addicted. I find myself checking it on my phone whenever I'm bored. Yikes. I need a rehab program or something. 

Anyway...  I might as well put something up while I'm at it, so here it is. My all time favorite chocolate cake recipe. I mean, this is THE BEST chocolate cake I have ever made. It is so moist and rich that you really don't need any frosting at all. The dark stout added to it gives it a rich, "malty" flavor (from the barley) so the chocolate isn't overpowering. It's just all sorts of awesome. This has been my go-to chocolate cake for all my adult friends (I make a standard one for kids -- why waste a good beer?).


Chocolate Stout Cake (makes two 8" - 9" rounds or about a dozen cupcakes):

日本語のレシピはこちら

I got this recipe from Smitten Kitchen, which was adapted from another recipe somewhere else. Here is the original Smitten Kitchen recipe. I am going to re-post it here, just because I have run into issues where you save a link to a great recipe and then one day the website is gone and so is your recipe! aaaah! Ok, here it is, with a few adjustments I had to make due to lack of ingredient availability in Japan.

Tools:
2 baking pans (8" or 9") or cupcake tins
baking spray or butter/flour
2 bake-even strips (see link to homemade strips in the instructions)
Measuring cup & spoons
1 Medium saucepan
2 large bowls (or just 1 if you have a stand mixer)
Hand or stand mixer, or a whisk & wooden spoon if you like it old school
Rubber spatula for scraping
Toothpick/cake tester

Ingredients:
1 cup stout (in Japan I used Ebisu)
1 cup (8Tb) unsalted butter**
3/4 cup unsweetened cocoa powder (I have used Van Houten and Hershey's and found no difference in taste)
2 cups all purpose flour
2 cups sugar
1 1/2 teaspoons baking soda
3/4 teaspoon salt
2 large eggs
2/3 cup yogurt (sour cream is scarce in Japan)
**butter is ridiculously expensive in Japan. I secretly used margarine and reduced the amount of salt, and you know what, nobody could tell the difference. However, now back in the land of affordable butter I am back to being honest.

Chocolate Buttercream Frosting (if you really must): adapted from the Joy of Baking
5 ounces (140 grams) unsweetened chocolate, chopped
1/3 cup (80 ml) milk
1/2 cup (113 grams) unsalted butter, softened and cut into pieces
4 cups (1 pound) (454 grams) confectioners (powdered or icing) sugar, sifted to remove lumps
1/8 teaspoon salt
2 teaspoons pure vanilla extract
(optional) 1Tb strong coffee or Irish Creme (like Baileys). For extracts use only 1tsp flavoring


For the Cake:

1. Preheat oven to 350°F (180°C) and prepare your pans by spraying with a non-stick spray or lining lightly with butter and sprinkling a bit of flour. I recently discovered this post from I am Baker on something called gloop. I have yet to try it, but it sounds like it works if you don't have oil spray on hand. To make your cakes bake evenly (so you don't get a "dome" in the middle), wrap the pans with moistened "bake even strips". If you don't have those, here is a video tutorial on how you can make them yourself!

2. Bring your stout and butter to a boil in a medium saucepan. Take off the burner, add cocoa powder and whisk so all the cocoa has blended. Let the mixture cool.
3. While the stout mixture is cooling, whisk together the flour, sugar, baking soda and salt in a large bowl and set aside. 

4. Using a stand or hand mixer, blend eggs and yogurt. Slowly add the stout mixture while continuing to blend. Be careful that the stout isn't too hot or you will cook your eggs!

5. Fold in flour mixture with a rubber spatula until just incorporated. You can also blend on the lowest setting of your mixer, but beware of flying flour. Pour batter evenly between your pans and bake for about 35min. 
*To test if your cake is done, lightly jiggle the pan and if the batter seems gloopy, bake another 7-8min. If the batter seems firm, lightly press it with your finger. If the cake doesn't bounce back and leaves a dent where you touched, it should be baked another 3-5min., depending on how firm the cake is. When you touch the cake and it bounces back, take a toothpick or cake tester and insert it into the deepest part of your cake (closer to the middle). If your toothpick comes out clean, your cake is done!
ok so this photo was taken when I didn't have any bake even strips AND I'm pretty sure I did them in 9" pans. Yes, I'm a big fat liar. Should still work for 8" pans.
6. Let your cakes cool at least 10min. before attempting to remove from pans, or you will end up with half your cake stuck to the bottom of the pan! Normally for regular cakes, I will remove right at the 10min. mark and then wrap them up and stick them in the freezer to keep the moisture in, but for this cake it's not necessary. So moist no matter how long you leave it out!

Follow the buttercream recipe or use your own. I find buttercream to be quite sweet so I make sure to use bitter/dark chocolate and I also add some brewed coffee. I have filled the center of this cake with raspberry jam, chocolate mousse (flavored with Baileys), fresh strawberry compote and chocolate ganache. The choice is yours. 
Here's one I did with chocolate ganache, pralines & pecans
Here is a triple layer one I did (way too big!) with a German Chocolate filling and turtle topping. German Chocolate filling recipe from Joy of Baking. I can't remember the caramel sauce recipe I used, but you can just bake a can of condensed milk until it caramelizes, then pour it over some pecans and coconut. Voila, turtle-ized cake!


Here is one I did with a "fort" theme, as requested by my friend. I filled it with chocolate mousse, covering the outside with Toppo (chocolate filled pretzels) and Pirouline cookies. The blocks on top are a chocolate cereal square and I added little plastic cowboys and indians, because I really didn't know what a fort was. The drawbridge is made from Pocky stuck together with melted chocolate and thread strung through straws hidden in the cake so the drawbridge would move up and down. Oh, I also ended up making some Welsh flags (because they had cowboys and indians in Wales) and staining a sign with coffee for the fort billboard.